Welcome to Little Treasured Things (LTT)!

I'm Back!

Friday, January 5, 2018

Reacting to One of my Oldest Blog Posts

Hello jammers!
I hate to say this, but, some of my posts were really bad and cringey, that's why I privated them (I'll be taking some back.)
And I'm going to react to one! Yay..
This one I remember doing back in the AJ Spring days.
It's named "Animal Jam Prom 2016".  I was planning to make it into separate posts, but I was too lazy ๐Ÿ˜‹
---


Ugh, I used to screenshot my pics, take them into MS Word, and crop them. On top of ALL THAT, I put a silly frame around them! Now I just use snipping tool. I'm going to ask my editors to crop that frame out for all my old posts ๐Ÿ˜…
I even used my old arctic wolf! I think my lynx with a double spike looks better. OOH, and that pet butterfly! I still have her! Soo many memories ๐Ÿ’œ


All the info here is true, except for the prices for the fur dye and makeup. This isn't something I would do now, making up info about fake stores (I make it sound so bad)!


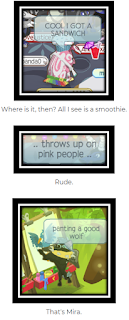
Ok, I must-ardmit... these jokes are pretty good. HAHA! Get it? Mustard? Must admit? Must-ardmit? I'm the best at jokes. Anyway, I'm talking about the little captions on the prom pictures. I remember the girl that said *throws up on pink people*. She, and her friends, were all dressed in black, spikes, and tophats. Not to be rude, but that's sooo typical. Then they said "eww, pink?!" Then I told them, "My favorite color's actually orange, not pink. What's your favorite color? Black? Like your soul?" Then they replied "then why r u wearing it?" I told them that they don't wear their favorite color all the time. Then, they said "*throws up on pink people*". The one where the hyena paints a wolf and it shows up as Mira is quite funny XD
---
Thanks for reading! I hope you enjoyed my old posts a little more than I did :)
You can check out this old post by searching "prom" in the top right corner of TDJ!
Have a good day,

๐Ÿ’œPrincessbg๐Ÿ’œ

Thursday, January 4, 2018

Different AJ Artist's Art Styles


Warning: Information may be outdated, but it is roughly correct.

Hello jammers! Today, I'll be showing you different AJ artist's art styles!
I have been taking lots of time to watch people's speedpaint videos. Do not steal.
Also, sorry if some information is incorrect. I tried my best, and I also started this post in 2016 and then abandoned it, so sorry if some info is missing too!


Artymis AJ

Steps

Step 1: Sketch the drawing freestyle in grey
Step 2: Start filling in sections with color and going in to get rid of grey lines
Step 3: Do minor details and repeat from step 2 to all the sections
Step 4: Going in with the airbrush for detail
Step 5: Using the smearing brush on certain areas if necessary
Step 6: Start filling in the background
Step 7: Use the airbrush and to minor detail to the background
Step 8: Start adding shading and lighting to the background
Step 9: Adding extra detail to any parts of the painting if necessary

Style

Realistic, hyper-realistic, lots of shading and lighting
Using references

emitree

Steps

Step 1: Make a rough outline (in color) of the drawing with the airbrush
Step 2: Use the smearing tool in some areas if necessary
Step 3: Start outlining the picture with the solid paintbrush in color
Step 4: Use the airbrush once again and use different sizes and colors for realism
Step 5: Start adding lighting and make the airbrush bigger
Step 6: Fill in the background and keep going with the rest of the picture
Step 7: Outline the drawing in a very small airbrush to remove the white
lines between the background and the picture
Step 8: Add more lighting an detail
Step 9: Use the smearing tool on certain areas if necessary

Style

Semi-realistic, a very bubbly texture
Lots of airbrush, some paintbrush and smearing tool
Mostly drawings of animals, humans, or everyday objects

 Foxbeats

Steps

Step 1: Sketch the drawing in grey
Step 2: Fill in the background using a solid color then go over with the
airbrush for extra detail, lighting, or shading
Step 3: Add extra objects in the background with the solid
paintbrush, such as trees or scenery
Step 4: Use the airbrush to add extra lighting and detail
Step 5: Go in with extra detail with the airbrush to resemble
far-away scenery or background objects
Step 6: Start working on your main focus, such as an
animal, object, or human being
Step 7: Keep working on the background and add extra details
if necessary
Step 8: Go in with the main focus and start coloring it in and doing extra
details if necessary
Step 9: Check the drawing and add shading, details, or lighting if necessary

Style

From cartoon to realism and all the in-betweens
Usually drawings of animals

Anasonyc AJ

Steps

Step 1: Sketch the drawing in grey
Step 2: Outline it in black and create smoother strokes and more detail
Step 3: Get rid of the grey lines
Step 4: Color the picture in and add the pattern
Step 5: Color in the clothing of the animal
Step 6: Fix any color outside of the black line
Step 7: Add detail like shading or lighting
Step 8: Go in and add lighting, shading, and more texture
Step 9: Add extra lighting and shading to make the art shine

Style

Semi-realistic, lots of shading and detail

SpiralWish AJ

Steps

Step 1: Use the curvy line tool and sketch the drawing in multiple colors
Step 2: Erase parts of the outline that are unnecessary or don't fit there
Step 3: Draw the clothing details freestyle, but the outlines are with using the curvy line tool and erase any unnecessary parts of the art
Step 4: Fill the drawing in and remove any white lines
Step 5: Add minor detail, shading, and lighting for a more realistic drawing
Step 6: Go in with more detail and linework for a better drawing
Step 7: Add major shading, lighting, and detail for a bit of a gradient to the color

Style

Cartoon-ish with some shading and lighting, lots of details for a cartoon
Only draws Animal Jam animals

RainbowCharizard

Steps

Step 1: Go in with a thick, black outline with a bit of
minor detail
Step 2: Add the clothing items whenever you hit that spot
Step 3: Start adding the main color, secondary color, and then the pattern
Step 4: Start coloring in the clothing items
Step 5: Add lighting with the medium airbrush tool
Step 6: Add shading with the medium airbrush tool

Style

Cartoon-ish with airbrush lighting and shading, semi-realistic animal anatomy
Only draws Animal Jam animals

yellowfr3ak

Steps

Step 1: Use a black small brush and go in with a rough sketch
Step 2: Use an airbrush and start coloring in the background
Step 3: Go in with different colored airbrushes and add detail to the
background for more realism
Step 4: Start coloring the main focus
Step 5: Add detail to the main focus for more realism
Step 6: Add detail, shine, and shading to give art some pop
Step 7: Keep going in with a bit more detail and add more features

Style

Hyper-realistic, mostly animals, high detail

---

Thank you for reading this post!

๐Ÿ’œPrincessbg๐Ÿ’œ

Jam Session Fun


I had LOTS of fun at JAM SESSION today!

Jam Session is a cool party!
Thank you to everyone who participated in the picture!!
=Gacha Kitty=

Commenting Rules

Please note that all comments are moderated before approval.
- Don't post using your school/personal account if I know you IRL. Just don't.
- No swearing.
- Don't comment negative things towards me, yourself, or other people.
- Don't say anything vulgar or distasteful.
- Keep comments on topic.
- Don't spam.